
Introduction
Spamming can be a persistent and frustrating problem for website owners. From cluttering your comment sections to affecting your site’s performance and user experience, spammers can cause significant damage if not managed correctly.
But fear not—here are five expert-approved techniques to help you defend your website against spamming.
What is Website Spamming?
Website spamming is when people post unwanted or irrelevant content on websites. They do this to promote their products, services, or other websites without permission.
Spammers use tactics like spam comments on blogs, unsolicited registrations, fake reviews, and irrelevant posts on forums and social media.
Often, they use automated bots to do this on a large scale. Their goal is to draw traffic away from legitimate users and manipulate search engine rankings. This practice can hurt user experience, damage a website’s reputation, and affect search engine performance.

1. Implement CAPTCHA and reCAPTCHA
One of the simplest yet most effective ways to deter spammers is to use CAPTCHA (Completely Automated Public Turing test to tell Computers and Humans Apart) or its more advanced version, reCAPTCHA.
These tools require users to complete a simple challenge, like identifying objects in images or typing out distorted text, to prove they are human.
Benefits
Filtering Out Automated Bot Submissions
| Feature | Description | Benefits |
| Captcha Implementation | Requires users to complete a challenge to prove they are human. | Prevents automated bot submissions effectively. |
| Honeypot Fields | Invisible fields that only bots fill out, automatically blocking those entries. | Reduces bot submissions without affecting user experience. |
| Rate Limiting | Limits the number of submissions a user can make in a given time frame. | Prevents bots from spamming forms with multiple submissions. |
| IP Blocking | Blocks IP addresses known for bot activity. | Stops known sources of automated spam. |
| Behavior Analysis | Analyzes user behavior to detect and block suspicious activities. | Enhances security by identifying and blocking bots in real-time. |
Enhancing User Experience by Keeping Spam at Bay
| Feature | Description | Benefits |
| Spam Filters for Comments | Uses algorithms to detect and filter out spam comments automatically. | Ensures only relevant and genuine comments appear. |
| Email Verification | Requires users to verify their email address before posting or registering. | Reduces fake registrations and maintains a clean user database. |
| Content Moderation | Allows admins to review and approve content before it goes live. | Maintains high-quality content on the website. |
| User Reporting Tools | Enables users to report spam or irrelevant content. | Empowers the community to help keep the site spam-free. |
| Regular Security Updates | Keeps the website’s security measures up to date to defend against new spam tactics. | Continually protects the site from emerging spam threats. |
These measures help ensure that a website remains a secure, spam-free environment, improving overall user satisfaction and maintaining the site’s vulnerability scan.
How to Implement
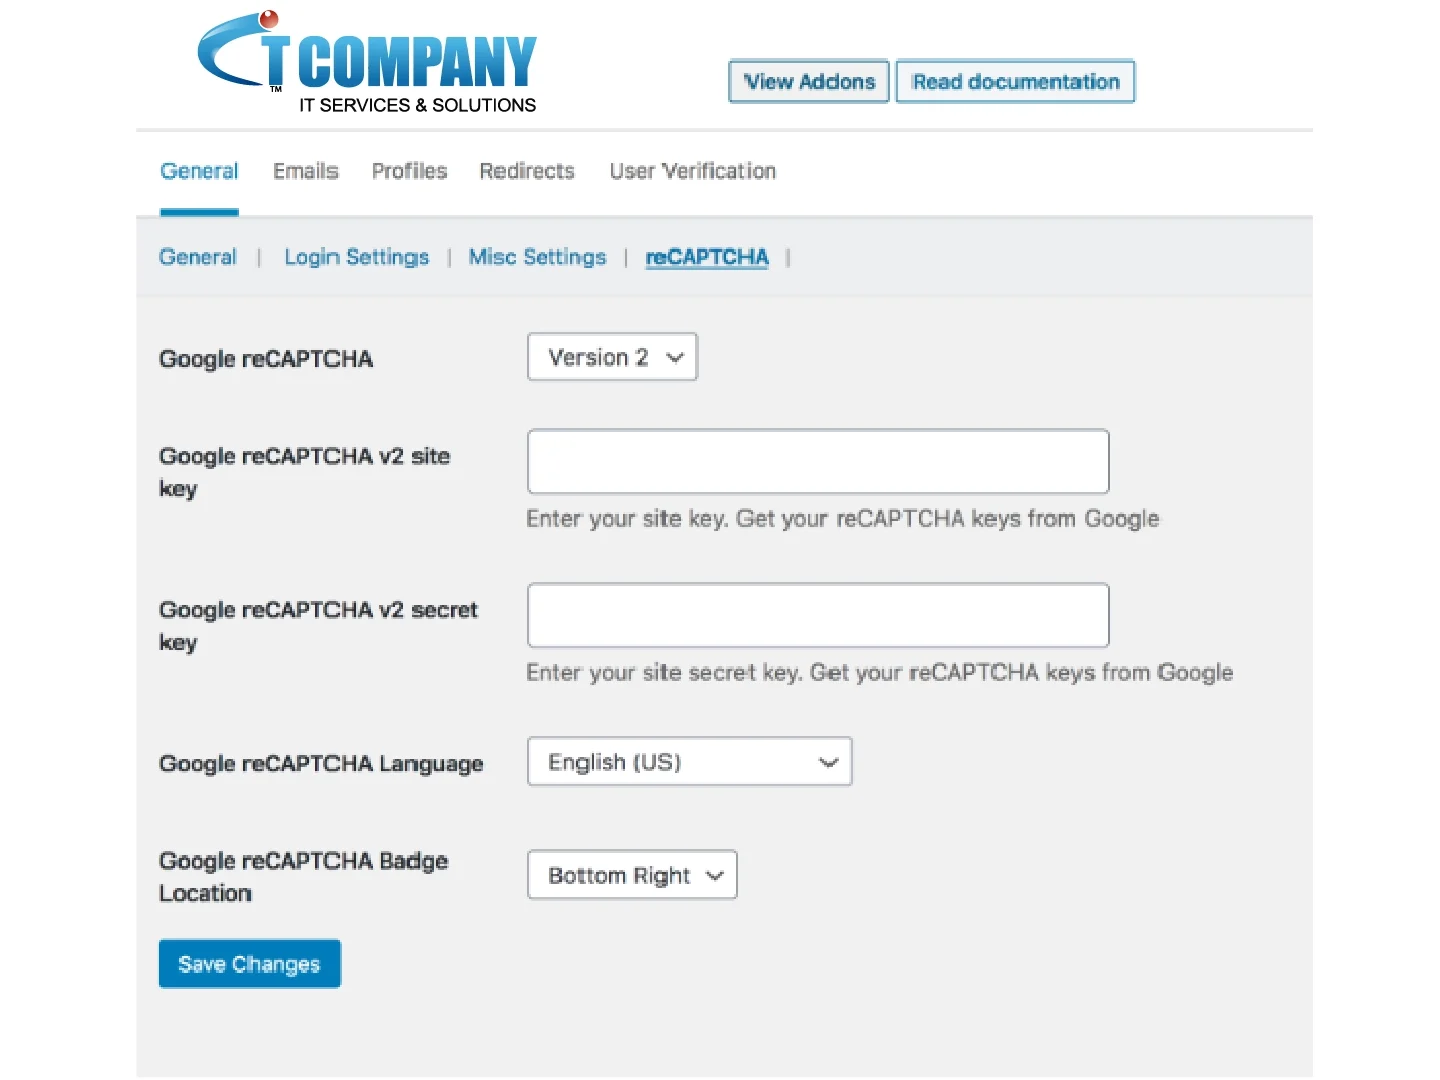
Step 1: Sign Up for Google reCAPTCHA
Go to Google reCAPTCHA: Visit the Google reCAPTCHA site.
Click on “Admin Console”: Log in with your Google account.
Register Your Site:
Label: Enter a label for your site.
reCAPTCHA Type: Select “reCAPTCHA v2” or “reCAPTCHA v3”.
Domains: Enter your domain name.
Accept Terms: Check the box to accept the terms.
Submit: Click the “Submit” button.
Copy Site Key and Secret Key: After registration, Google will provide you with a Site Key and Secret Key. Keep these handy.
Step 2: Install a reCAPTCHA Plugin on WordPress
Log into Your WordPress Admin Panel: Go to your WordPress site and log in.
Navigate to Plugins: Click on “Plugins” in the left-hand menu and select “Add New”.
Search for reCAPTCHA Plugin: In the search bar, type “reCAPTCHA”. Install a popular plugin like “reCAPTCHA by BestWebSoft” or “Google Captcha (reCAPTCHA) by BestWebSoft”.
Click “Install Now”: Once you find the plugin, click the “Install Now” button.
Activate the Plugin: After installation, click “Activate”.
Step 3: Configure the reCAPTCHA Plugin
Go to Plugin Settings: Once the plugin is activated, navigate to the plugin’s settings page (usually found under “Settings” or the plugin name in the left-hand menu).
Enter Site Key and Secret Key: Paste the Site Key and Secret Key you got from Google into the corresponding fields in the plugin settings.
Choose reCAPTCHA Version and Settings:
Select reCAPTCHA Version: Choose between v2 or v3, depending on your preference.
Select Where to Display reCAPTCHA: Check the boxes for the forms you want to protect (e.g., login form, registration form, comment form).
Save Changes: Click the “Save Changes” button to apply the settings.
Step 4: Verify reCAPTCHA Integration
Visit Your Site: Go to your WordPress site and navigate to a form where reCAPTCHA should be active (e.g., the contact form or comment section).
Check for reCAPTCHA: Ensure that the reCAPTCHA widget appears on the form.
Image Detail: A screenshot of a WordPress form with the reCAPTCHA widget displayed.
Use Honeypot Fields
Honeypot fields are hidden form fields that are not visible to human users but can trap bots that fill out every field they encounter. When a bot completes these hidden fields, the form submission is flagged as spam and discarded.
Benefits
- Does not inconvenience legitimate users.
- Effective against basic bots.
How to Implement:
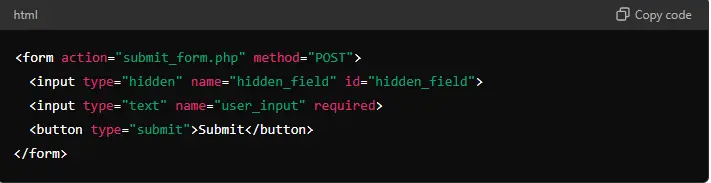
Hidden Field to Form using CSS
Step 1: Add the hidden field to you form
Add a hidden field in your HTML form and use CSS to hide it from users.
Step 2: Hide the Field Using CSS
Use CSS to hide the hidden field.

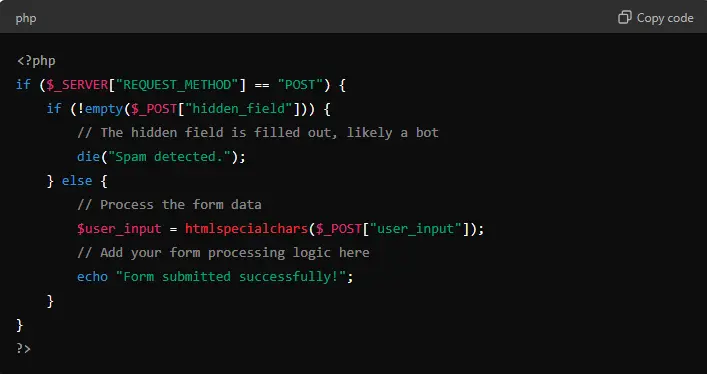
Step 3: Server-Side Script to Check the Hidden Field
Create a server-side script (e.g., PHP) to check if the hidden field is filled out. This can help detect bots.
3. Enable Content Moderation
Content moderation allows you to manually approve comments and form submissions before they go live on your site. While this can be time-consuming, it ensures that no spam content makes it past your review.
Benefits
- Provides control over what gets published.
- Allows you to filter out spam manually.
How to Implement
- To manage a high volume of submissions on your website, it’s essential to utilize built-in moderation features and consider additional resources if necessary.
Here’s a step-by-step guide
Step 1: Use CMS Built-in Moderation Features
For platforms like WordPress, follow these steps to enable and configure comment moderation settings:
WordPress Example
Login to Your Dashboard: Navigate to Settings > Discussion.
Moderation Settings: Configure the following:
Comment Moderation: Hold comments in a queue if they contain specific keywords or links.
Comment Blacklist: Automatically mark comments containing certain words or phrases as spam.
Email Notifications: Enable notifications for new comments, so you can review them promptly.
Step 2: Enable Akismet or Similar Plugins
Use plugins like Akismet to filter out spam comments automatically.
Install and Activate Akismet: Go to Plugins > Add New, search for Akismet, install, and activate it.
Configure Akismet: Enter your API key and adjust the settings to suit your needs.
Step 3: Manual Review and Approval
Ensure you manually review and approve comments or submissions to maintain content quality.
Pending Comments: Go to Comments in the WordPress dashboard and review pending comments.
Approve, Edit, or Delete: Approve, edit, or delete comments based on your content guidelines.
Step 4: Hire a Content Moderator
If your website receives a high volume of submissions, consider hiring a content moderator to manage and review the content.
Job Posting: Create a job posting on platforms like LinkedIn, indeed, or specialized content moderation services.
Interview and Selection: Screen candidates for relevant experience in content moderation.
Training: Provide training on your content guidelines, CMS, and moderation tools.
4. Regular Security Audits
Conducting regular security audits helps identify and fix vulnerabilities before exploitation, prevents spam attacks by closing loopholes, and ensures all software and plugins are up to date, reducing risks.
It also detects suspicious activities early, allowing for quick responses, and continuously improves your website’s overall security posture.

Step by Step Process
- Plan Your Audit:
- Decide what you want to check and why.
- Make a list of areas to review, like software updates and user accounts.
- Update Everything:
- Make sure your CMS, themes, and plugins are all up-to-date.
- Check for new updates and install them.
- Backup Your Website:
- Save a copy of your website before making changes.
- Keep the backup safe in case you need it later.
- Install Security Plugins:
- Add plugins like Wordfence or Sucuri to help find security problems.
- Set them up to scan your website.
- Run Security Scans:
- Use the plugins to look for malware and weak spots.
- Pay attention to any warnings or issues they find.
- Check User Accounts:
- Look at all user accounts on your site.
- Remove any that shouldn’t be there or haven’t been used in a while.
- Review Logs:
- Check the logs to see who’s been accessing your site.
- Look for anything unusual or suspicious.
- Update Security Policies:
- Make sure your security rules are strong.
- Use things like strong passwords and two-factor authentication.
- Fix Problems:
- Fix any issues the audit found.
- Update settings, remove bad files, and apply patches.
- Document Your Work:
- Write down what you checked and what you fixed.
- Share this with your team and plan to do it again regularly.
By following these steps, you can ensure your website remains secure and protected from spam attacks and other security threats.
5. Use Email Verification
By requiring users to verify their email addresses before they can post comments or register, you add an extra layer of security against spam. This step prevents bots from creating fake accounts or posting fake reviews.
Benefits:
- Ensures user authenticity.
- Reduces spam sign-ups and comments.
How to Implement
Plugin installation in WordPress. The are many plugins such as Email Verification / SMS verification / OTP Verification” plugin from the WordPress Plugin Directory. All you will have to do is go to
installation > Activation > and using it where it is required.

Conclusion
Spamming can degrade the quality and credibility of your website, but by applying these expert-approved techniques, you can significantly reduce its impact. Implement these 5 techniques such as CAPTCHA, use honeypot fields, enable content moderation, install anti-spam plugins, and require email verification to create a robust defense against spammers.
Take action today and keep your website secure and user-friendly. Have any questions or need further assistance? Feel free to reach out to our support team!